Change Default Margin In Microsoft Word For Mac Document
This document details how to change the default font, font size, and page margins in Word. • • • • Open a new document, click on the Home tab, click on the Font dialog box button as shown in the screenshot below, and select the Font tab. Windows live movie maker for mac os x.
• Choose the font settings that you would like to make the default and click Set As Default • Select All documents based on the Normal.dotm template? How do i i get rid of focused and other email in ourtlook 2016 for mac download. And click OK to update the default for all new documents.
By default, it will be inline with text and will fill the width of the text area. With the photo still selected, click on the Picture Format tab and choose Position>More Layout Options. Click on the Text Wrapping tab and choose Behind Text.
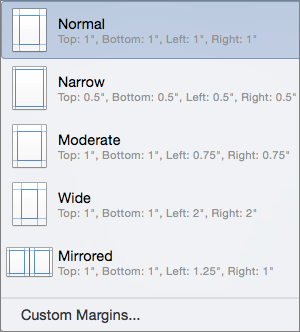
• To change Word's default page margins, click on the Page Layout tab and click on the Page Setup dialog box button as shown in the screenshot below. • Set the new margins that you would like to make the default and click Set As Default • Click Yes to apply the new margins to all new documents. • Open a new document, click on the Home tab, click on the Font Dialog Box Launcher (as shown in the screenshot below) and select the Font tab. • Select a new font and size in the Font dialog box, and then click Default. Word will ask you if you want these changes to apply to all new documents using the 'Normal template' (normal.dot). • Click Yes to make the changes permanent.
The change will apply to Word's Normal/default style and to all styles based on Normal. • To change Word's default page margins, click the Page Setup Dialog Box launcher as shown in the screenshot below. • The first tab should be Margins. Make your changes to the margins here, and then click Default. • Click Yes when Word asks you to confirm the changes. This warning will look exactly like the one shown above.

Note:You can also change other settings affecting page layout (including paper orientation and line numbering) in the same dialog box. • Open a new document and select Format > Font. • Select a new font and size in the Font dialog box, and then click Default. Word will ask you if you want these changes to apply to all new documents using the 'Normal template' (normal.dot). • Click Yes to make the changes permanent. The change will apply to Word's Normal/default style and to all styles based on Normal.
• To change Word's default page margins, select File > Page Setup. The first tab should be Margins, make your changes to the margins here, and then click Default. • Click Yes when Word asks you to confirm the changes.
This warning will look exactly like the one shown above. Note: You can also change other settings affecting page layout (including paper orientation and line numbering) in the same dialog box.