How To Insert Checkbox In Word For Mac
You have not defined what is a 'normal', non 'Artsy' check box, but I assume you want a plain square. There are a few things you can do.
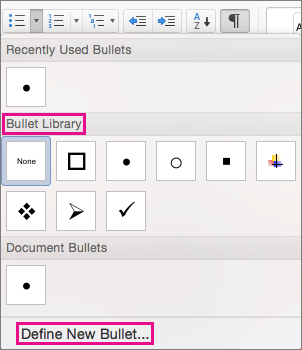
• Select the line or lines of text that you wish to add checkboxes to. If you just want to insert standalone boxes then you can skip this step. • Click on the Home tab, if it is not already selected. • Select the drop-down list accompanying the Bullets button, circled in the accompanying screenshot example. • When the Bullet Library pop-out appears, click on Define New Bullet. • The Define New Bullet dialog should now be displayed, overlaying the main Word window.
Click on the Symbol button. • Dozens of available symbols will now appear. Scroll up or down until you locate one suitable to use as a checkbox, clicking on it once to select it. Mac fix plus spray ingredients. If you do not see an option that you like, choose a different value from the Font drop-down list (i.e., Webdings) and peruse additional sets of symbols. • Once satisifed with your selection, click on OK.
• You'll now be returned to the Define New Bullet interface. Select OK again. If you followed the instructions correctly, one or more checkboxes should now be added to your document.
• Click on File, located in the upper left-hand corner of the Word interface. • Select Options. • The Word Options dialog should now appear, overlaying the other open windows. Click on Customize Ribbon. • Under Customize the Ribbon, choose the Main Tabs option from the drop-down menu if it is not already selected. • Locate the Developer option and click on the 'plus' symbol found to the left of its name, expanding the list. Next, place a check mark next to Developer by clicking on its accompanying checkbox once.
• Click on the 'plus' symbol next to the option labeled Controls, expanding its list as well. • Select Check Box Content Control and click the OK button to return to the main Word interface. • Click on the Developer tab, now added to the main menu towards the top of your screen. • In the Controls section, select the checkbox icon. • A new checkbox should now be inserted into your document.
The main difference with this checkbox and the one that we inserted in the previous tutorial is that it is active and a user can place a mark in it by clicking on it once. By default, an 'X' is placed in the checkbox when it is clicked upon. This symbol can be changed, along with many other attributes of your new checkbox, by selecting it and clicking on the Properties button – found within the Controls section. From here you can modify the appearance of both checked and unchecked symbols, as well as the behavior of the checkbox itself when utilized within your electronic document.
Not contradicting John whatsoever, but if this is a properly constructed form (such as would be downloaded from a web site) you should not have to edit/replace the characters in the document. You should be able to either click the box to place a check in it or tab to the check box & press the space bar. I have a feeling that there may be something more about this application document & its source that you haven't revealed:-) Are you sure this application is intended to be completed electronically? Please mark HELPFUL or ANSWERED as appropriate to keep list as clean as possible ☺ Regards, Bob J.